Panduan manual Alesis Vortex Wireless2
Editor
User Guide English
Manual Version 1.0
Table of Contents
Introduction ............................................. 3 Support ................................................. 3 Installation ........................................... 3 Getting Started .................................... 3
Operation ................................................. 4
Software Menus .................................. 4 File ..................................................... 4 Help ................................................... 4
Managing Your Presets ...................... 5 About Presets .................................... 5 Loading Presets ................................. 5 Saving Presets ................................... 5 Sending Presets ................................ 5
Editing the Controls ............................ 6 Pads .................................................. 6 Faders ............................................... 8 Touch Ribbon .................................... 9 Tilt .................................................... 10 Pitch Wheel / Volume / Sustain ....... 11 Program Change / Keybed .............. 12
Appendix ................................................ 14 Velocity Curves .................................. 14 Trademarks & Licenses .................... 14
2
Introduction
Thank you for purchasing the Vortex Wireless 2. At Alesis, we know how serious music is to you. That’s why we design our equipment with only one thing in mind—to make your performance the best it can be.
Support
For the latest information about this product (documentation, technical specifications, system requirements, compatibility information, etc.) and product registration, visit alesis.com.
For additional product support, visit alesis.com/support.
Installation
Windows®:
1. Double-click the .exe installer file you downloaded.
2. Follow the on-screen instructions.
macOS®:
1. Double-click the .dmg installer file you downloaded.
2. Click and drag the Alesis Vortex Wireless 2 Preset Editor icon into your Applications folder.
Getting Started
To open the Vortex Wireless 2 Editor:
1. Optional: Connect your Vortex
Wireless 2 keyboard to your computer
using a standard USB cable. (If you
are connecting your keyboard to a
USB hub, make sure it is a powered
hub.) You can still use the editor
without connecting a Vortex Wireless
2, but you will not be able to send
presets to it or load (get) presets from
it.
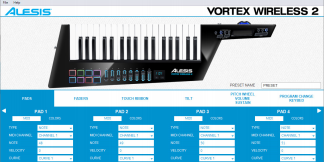
2. Open the Vortex Wireless 2 Editor.
The window will show a graphical
representation of your Vortex Wireless
2 with all of its editable controls at the
bottom of the window in tabs.
To name your preset, type in the Preset Name text box.
To edit the parameters for a type of control on your Vortex Wireless 2, click the tab with the name of the desired control.
Click one of the types of controls on the right to jump to that section of this User Guide.
Pads
Faders
Touch Ribbon Tilt
Pitch Wheel/Volume/Sustain Program Change/Keybed
3
Operation
Software Menus
File
New Preset: Select this to open a new Vortex Wireless 2 Preset. Alternatively, press Ctrl+N (Windows) or ⌘+N (macOS).
Send Preset: Select this to export the current settings from the Preset Editor to your connected Vortex Wireless 2 keyboard. Alternatively, press Ctrl+Shift+S (Windows) or ⌘+Shift+S (macOS).
Retrieve Preset: Select this to import the current settings from your connected Vortex Wireless 2 keyboard into the Preset Editor. Alternatively, press Ctrl+Shift+R (Windows) or ⌘+Shift+R (macOS)
Load Preset: Select this to locate and load a Preset file (.vw2) on your computer to the Preset Editor. Alternatively, press Ctrl+O (Windows) or ⌘+O (macOS).
Save Preset: Select this to save the Preset Editor's current settings to your computer as a Preset file (.vw2). Alternatively, press Ctrl+S (Windows) or ⌘+S (macOS).
Update USB Receiver Pairing: Select this if you need to pair your Vortex Wireless 2 with another USB receiver. Locate the serial number on your USB receiver and enter the last 6 digits in the window that appears. Click the Program button to pair your Vortex Wireless 2 to the new USB receiver, or click Close to cancel the operation.
Exit: Select this to close the Vortex Wireless 2 Preset Editor.
macOS users: This option is in the Vortex Wireless 2 Preset Editor menu.
Help
Open User Guide: Select this to open this User Guide.
About: Select this to view information about this version of the Vortex Wireless 2 Preset Editor. macOS users: This option is in the Vortex Wireless 2 Preset Editor menu.
4
Managing Your Presets
About Presets
A preset is a preset file (.vw2) containing all of the MIDI assignments you make in the editor. Using presets lets you maintain several different control configurations to use in different situations. For instance, you may use different presets with different kinds of software, or you may some presets for production and others for performance.
Your Vortex Wireless 2 keyboard can store 25 presets at a time. You can store additional presets on your computer to load onto your Vortex Wireless 2 keyboard with this editor.
This chapter explains how to load presets into the editor (Loading Presets), save presets onto your computer (Saving Presets), and send presets to your connected Vortex Wireless 2 keyboard (Sending Presets).
Loading Presets
To edit a preset, you first have to load it into the Vortex Wireless 2 Editor.
To load a preset from your connected Vortex Wireless 2:
1. Go to File > Retrieve Preset.
2. In the window that appears, click the Preset Slot drop-down menu to select the desired preset number. 3. Click Get to confirm or Cancel to cancel the operation.
Editing this preset will not affect the preset stored on your Vortex Wireless 2. See Sending Presets below to learn how to send the edited preset to your Vortex Wireless 2.
To load a preset from your computer, do one of the following:
• Go to File > Load Preset.
• Press Ctrl+O (Windows) or ⌘+O (macOS).
After that, locate the desired preset file (.vw2), and click Open.
Saving Presets
Saving a preset on your computer lets you edit it or send it to your Vortex Wireless 2 in the future. All MIDI assignments that you see in the editor will be saved in the preset.
To save the preset, do one of the following:
• Go to File > Save Preset.
• Press Ctrl+S (Windows) or ⌘+S (macOS).
After that, select the desired location, enter a file name, and click Save. The preset will be saved as a .vw2 file.
Sending Presets
Sending a preset to your connected Vortex Wireless 2 lets you transfer the preset from the editor to your Vortex Wireless 2 keyboard's internal memory. All MIDI assignments that you see in the editor will be sent to your Vortex Wireless 2.
To send a preset to your connected Vortex Wireless 2:
1. Go to File > Send Preset.
2. In the window that appears, click the Preset Slot drop-down menu to select the desired preset number.
3. Click Send to confirm or Cancel to cancel the operation. (Sending the preset will overwrite that preset number on your Vortex Wireless 2.)
5
Editing the Controls
Pads
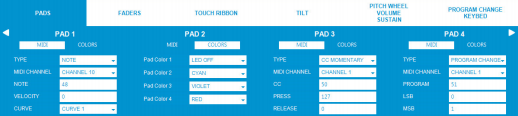
Click the Pads tab to set the MIDI assignments and Colors for Vortex Wireless 2's Pads. Click MIDI or Colors below the Pad number to toggle between the editing options. Click the left or right arrows on the sides of the window to toggle between viewing Pad 1–4 and Pad 5–8.
MIDI
Type: Click this menu and select one of the following options. The parameters below will depend on your selection.
• Note: The pad will send a MIDI Note On message when you press it and hold it and a MIDI Note Off message when you release it.
• CC Toggle: The pad will send a CC message with one value when you press it to turn it on and another value when you press it to turn it off. The values will alternate with each press.
• CC Momentary: The pad will send a CC message with one value when you press and hold it and another value when you release it.
• Program Change: The pad will send Program Change messages.
• Panic: The pad will send a MIDI Panic (all notes off) message.
MIDI Channel: The pad will send its MIDI messages over this channel. Click this menu and select Channel 1 – Channel 16.
Note (when Type is set to Note): The pad will send this MIDI note number when you press it. Click it and enter a number (0–127).
Velocity (when Type is set to Note): When this is set to a number from 1 to 127, the pad will send its MIDI Note On message with this velocity regardless of how hard you press it. When this is set to 0, the pad will send its MIDI Note On message with a velocity based on how hard you hit it and the Curve setting. Click it and enter a number (0–127).
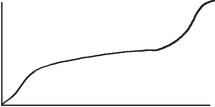
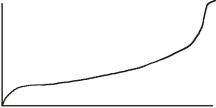
Curve (when Type is set to Note): The pad will use this velocity curve number to determine what velocity to use depending on how hard you press it. Click this menu and select Curve 1 – Curve 8. See Appendix > Velocity Curves for an illustration of the curves.
CC (when Type is set to CC Toggle or CC Momentary): The pad will send its MIDI messages using this CC number. Click it and enter a number (0–127).
6
On (when Type is set to CC Toggle): The pad will send this value when you press it to turn it on. Click it and enter a number (0–127).
Off (when Type is set to CC Toggle): The pad will send this value when you press it to turn it off. Click it and enter a number (0–127).
Press (when Type is set to CC Momentary): The pad will send this value when you press and hold it. Click it and enter a number (0–127).
Release (when Type is set to CC Momentary): The pad will send this value when you release it. Click it and enter a number (0–127).
Program (when Type is set to Program Change): The pad will send this Program Change number when you press it. Click it and enter a number (0–127).
LSB (when Type is set to Program Change): The pad will send this Bank LSB (Least Significant Byte) number when you press it. Click it and enter a number (0–127).
MSB (when Type is set to Program Change): The pad will send this Bank MSB (Most Significant Byte) number when you press it. Click it and enter a number (0–127).
Colors
You can assign up to 4 colors to each pad. Click each Pad Color menu and select a color: LED Off, Chartreuse, Green, Aquamarine, Cyan, Azure, Blue, Violet, Magenta, Rose, Red, Orange, Yellow, or White.
When Type is set to Note, the Colors are assigned according to the following:
• Color 1: The color of the pad when it is inactive.
• Color 2: The color of the pad when it is triggered with a velocity from 1–63.
• Color 3: The color of the pad when it is triggered with a velocity from 64–95.
• Color 4: The color of the pad when it is triggered with a velocity from 96–127.
When the Type is set to CC Toggle, CC Momentary, Program Change, or Panic, only Color 1 and Color 2 are assigned according to the following:
• Color 1: The color of the pad when it is off, released, or inactive.
• Color 2: The color of the pad when it is on, pressed, or active.
7
Faders
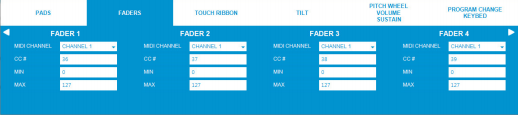
Click the Faders tab to set the MIDI assignments for Vortex Wireless 2's Faders. Click the left or right arrows on the sides of the window to switch between viewing Fader 1–4 and Fader 5–8.
MIDI Channel: The fader will send its MIDI messages over this channel. Click this menu and select Channel 1 – Channel 16.
CC #: The fader will send its MIDI messages using this CC number. Click it and enter a number (0–127). Min: This will be the lowest value that the fader can send. Click it and enter a number (0–127). Max: This will be the highest value that the fader can send. Click it and enter a number (0–127).
8
Touch Ribbon
Click the Touch Ribbon tab to set the MIDI assignments for Vortex Wireless 2's ribbon controller.

Touch Ribbon Settings
Default Bank: Click this menu to set the Default Bank when the preset is selected. Select Bank 1, Bank 2, or Bank 3.
Release Mode: Click this menu to select one of the following options.
• Latch: The ribbon controller will not send additional MIDI messages when you release it, which is useful for changing modulation parameters.
• Return: The ribbon controller will send the default MIDI message for the controller when you release it, which is useful for changing parameters like pitch bend.
Bank 1/2/3
Type: Click this menu and select one of the following options.
• CC: The ribbon controller will send Control Change MIDI messages.
• Pitch Bend: The ribbon controller will send Pitch Bend MIDI messages.
MIDI Channel: The ribbon controller will send its MIDI messages over this channel. Click this menu and select Channel 1 – Channel 16.
CC #: When Type is set to CC, the ribbon controller will send its MIDI messages using this CC number. Click it and enter a number (0–127).
Min: This will be the lowest value that the ribbon controller can send. Click it and enter a number (0–127). Max: This will be the highest value that the ribbon controller can send. Click it and enter a number (0–127).
9
Tilt
Click the Tilt tab to set the MIDI assignments for Vortex Wireless 2's accelerometer.

Type: Click this menu and select one of the following options.
• CC: The accelerometer will send Control Change MIDI messages.
• Pitch Bend: The accelerometer will send Pitch Bend MIDI messages.
MIDI Channel: The accelerometer will send MIDI messages over this channel. Click this menu and select Channel 1 – Channel 16.
CC #: When Type is set to CC, the accelerometer will send its MIDI messages using this CC number. Click it and enter a number (0–127).
Min: This will be the lowest value that the accelerometer can send. Click it and enter a number (0–127). Max: This will be the highest value that the accelerometer can send. Click it and enter a number (0–127).
10
Pitch Wheel / Volume / Sustain
Click this tab to set the MIDI assignments for Vortex Wireless 2's pitch wheel, volume slider, and sustain controls.
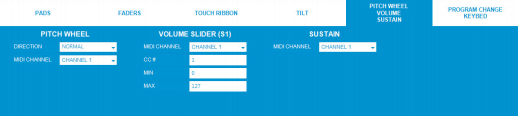
Pitch Wheel
Direction: Click this menu and select one of the following options.
• Normal: The pitch is increased when the wheel is turned to the right, and decreased when the wheel is turned to the left.
• Reverse: The pitch is decreased when the wheel is turned to the right, and increased when the wheel is turned to the left.
MIDI Channel: The pitch wheel will send its MIDI messages over this channel. Click this menu and select Channel 1 – Channel 16.
Volume Slider (S1)
MIDI Channel: The volume slider will send its MIDI messages over this channel. Click this menu and select Channel 1 – Channel 16.
CC #: The volume slider will send its MIDI messages using this CC number. Click it and enter a number (0–127). Min: This will be the lowest value that the volume slider can send. Click it and enter a number (0–127). Max: This will be the highest value that the volume slider can send. Click it and enter a number (0–127).
Sustain
MIDI Channel: The sustain control will send its MIDI messages over this channel. Click this menu and select Channel 1 – Channel 16.
11
Program Change / Keybed

Click the Program Change/Keybed tab to set Program Change parameters for when presets are loaded and the MIDI assignments for Vortex Wireless 2's keys.
Program Change
Send On Load: Click this menu and select one of the following options.
• Yes: Vortex Wireless 2 will send a combined program number, Bank MSB, and Bank LSB number when a Preset is loaded. This can be useful for selecting a preset from a specific bank of a virtual instrument or synthesizer (the instrument or synthesizer must support these messages).
• No: No messages are sent when a Preset is loaded.
Program #: The Program Change number sent when a preset is loaded. Click it and enter a number (0–127).
Program LSB: The Bank LSB (Least Significant Byte) number sent when a preset is loaded. Click it and enter a number (0–127).
Program MSB: The Bank MSB (Most Significant Byte) number sent when a preset is loaded. Click it and enter a number (0–127).
Split Point
Curve: The keybed will use this velocity curve number to determine what velocity to use depending on how hard you press it. Click this menu and select Curve 1 – Curve 8. See Appendix > Velocity Curves for an illustration of the curves.
Split Mode: Click this menu and select one of the following options.
• On: The keybed will be split into two sections at the Split Key: the lower register (Lower Zone) and upper register (Upper Zone). For each section, you can set its MIDI channel, transposition, and MIDI to DIN status. See the next section for more details.
• Off: The keybed will use only one MIDI channel, transposition, and MIDI to DIN status, which you can set.
Split Key: This number indicates how many keys (starting from the lowest-register key) are in the Lower Zone section. Any keys above this section belong to the Upper Zone. Click it and enter a number (1–36).
12
Lower Zone / Upper Zone
MIDI Channel: The zone will send its MIDI messages over this channel. Click this menu and select Channel 1 – Channel 16.
Transpose: The zone will be transposed up or down by this many semitones. 0 indicates no transposition. 12 semitones is a full octave. Click it and enter a number (-12 to 12).
MIDI to DIN: Click the menu to select one of the following options:
• On: The zone's MIDI messages will be sent out of the USB Port and MIDI Out.
• Off: The zone's MIDI messages will be sent out of the USB Port only.
13
Appendix
Velocity Curves
1 5
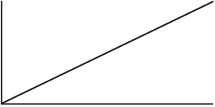
MIDI Velocity
127
Force of
Press
2 6

MIDI Velocity
127
Force of
Press
3 7
MIDI Velocity
127
Force of
Press
4 8

MIDI Velocity
127
Force of
Press
Trademarks & Licenses
MIDI Velocity 127

MIDI Velocity 127

MIDI Velocity 127
MIDI Velocity 127

Force of Press
Force of Press
Force of Press
Force of Press
Alesis is a trademark of inMusic Brands, Inc., registered in the U.S. and other countries. Windows is a registered trademark of Microsoft Corporation in the United States and other countries. macOS is a trademark of Apple Inc., registered in the U.S. and other countries.
All other product names, company names, trademarks, or trade names are those of their respective owners.
14
alesis.com

Komentar
Posting Komentar