Regulatory and Safety Information
Users in U.S.A
This product has been tested and found to comply with the limits for a Class B digital devices, pursuant to Part 15 of the FCC Rules. These limits are designed to provide reasonable protection against harmful interference in a residential installation. This equipment generates, uses, and can radiate radio frequency energy and, if not installed and used in accordance with the instructions, may cause harmful interference to radio communications. However, there is no guarantee that interference will not occur in a particular installation. If this equipment does cause harmful interference to radio or television reception, which can be determined by turning the equipment off and on, the user is encouraged to try to correct the interference by one or more of the following measures:
– Reorient or relocate the receiving antenna.
– Increase the separation between the equipment and receiver.
– Connect the equipment into an outlet on a circuit different from that to which the receiver is connected. – Consult the dealer or an experienced radio/TV technician for help
This device complies with part 15 of the FCC Rules. Operation is subject to the following two conditions: 1) This device may not cause harmful interference.
2) This device must accept any interference received, including interference that may cause undesired operation.
FCC CAUTION: Any unauthorized changes or modifications not expressly approved by the party responsible for compliance could void the user’s authority to operate the equipment.
Note: The manufacturer is not responsible for any radio or tv interference caused by unauthorized modifications to this equipment. Such modifications could void the user’s authority to operate the equipment.
Radiation Exposure Statement
The available scientific evidence does not show that any health problems are associated with using low power wireless devices. There is no proof, however, that these low power wireless devices are absolutely safe. Low power Wireless devices emit low levels of radio frequency energy (RF) in the microwave range while being used. Whereas high levels of RF can produce health effects (by heating tissue), exposure of low-level RF that does not produce heating effects causes no known adverse health effects. Many studies of low-level RF exposures have not found any biological effects. Some studies have suggested that some biological effects might occur, but such findings have not been confirmed by additional research. This device has been tested and found to comply with FCC radiation exposure limits set forth for an uncontrolled environment and meets the FCC radio frequency (RF) Exposure Guidelines in Supplement C to OET65.
Users in Canada
This device complies with Industry Canada licence-exempt RSS standard(s). Operation is subject to the following two conditions: (1) this device may not cause interference, and
(2) this device must accept any interference, including interference that may cause undesired operation of the device.
Le présent appareil est conforme aux CNR d'Industrie Canada applicables aux appareils radio exempts de licence. L'exploitation est autorisée aux deux conditions suivantes : (1) l'appareil ne doit pas produire de brouillage, et (2) l'utilisateur de l'appareil doit accepter tout brouillage radioélectrique subi, même si le brouillage est susceptible d'en compromettre le fonctionnement.
Under Industry Canada regulations, this radio transmitter may only operate using an antenna of a type and maximum (or lesser) gain approved for the transmitter by Industry Canada. To reduce potential radio interference to other users, the antenna type and its gain should be so chosen that the equivalent isotropically radiated power (e.i.r.p.) is not more than that necessary for successful communication.
Conformément à la réglementation d'Industrie Canada, le présent émetteur radio peut fonctionner avec une antenne d'un type et d'un gain maximal (ou inférieur) approuvé pour l'émetteur par Industrie Canada. Dans le but de réduire les risques de brouillage radioélectrique à l'intention des autres utilisateurs, il faut choisir le type d'antenne et son gain de sorte que la puissance isotrope rayonnée équivalente (p.i.r.e.) ne dépasse pas l'intensité nécessaire à l'établissement d'une communication satisfaisante.
Radiation Exposure Statement
The available scientific evidence does not show that any health problems are associated with using low power wireless devices. There is no proof, however, that these low power wireless devices are absolutely safe. Low power Wireless devices emit low levels of radio frequency energy (RF) in the microwave range while being used. Whereas high levels of RF can produce health effects (by heating tissue), exposure of low-level RF that does not produce heating effects causes no known adverse health effects. Many studies of low-level RF exposures have not found any biological effects. Some studies have suggested that some biological effects might occur, but such findings have not been confirmed by additional research. This device has been tested and found to comply with IC radiation exposure limits set forth for an uncontrolled environment and meets RSS-102 of the IC radio frequency (RF) Exposure rules.
Les connaissances scientifiques dont nous disposons n’ont mis en évidence aucun problème de santé associé à l’usage des appareils sans fil à faible puissance. Nous ne sommes cependant pas en mesure de prouver que ces appareils sans fil à faible puissance sont entièrement sans danger. Les appareils sans fil à faible puissance émettent une énergie radioélectrique (RF) très faible dans le spectre des micro-ondes lorsqu’ils sont utilisés. Alors qu’une dose élevée de RF peut avoir des effets sur la santé (en chauffant les tissus), l’exposition à de faibles RF qui ne produisent pas de chaleur n’a pas de mauvais effets connus sur la santé. De nombreuses études ont été menées sur les expositions aux RF faibles et n’ont découvert aucun effet biologique. Certaines études ont suggéré qu’il pouvait y avoir certains effets biologiques, mais ces résultats n’ont pas été confirmés par des recherches supplémentaires. Cet appareil a été testé et jugé conforme aux limites d’exposition aux rayonnements énoncées pour un environnement non contrôlé et respecte les règles d’exposition aux fréquences radioélectriques (FR) RSS-102 de l’IC.
Quick Guide
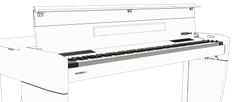
Welcome to the quick guide of VIVO H10 MG and congratulations to purchasing this Digital Piano.
The flagship VIVO H10 MG Digital Piano uses Dexibell's latest technology to give players the ultimate piano sound. This instrument is the perfect and accurate simulation of an acoustic grand piano, each element of this piano has been carefully designed to spread a warm acoustic environment in the room, just like a grand piano, reverberating the sound over the whole body of the instrument. The splendid grand piano cabinet adds a touch of splendor to any room. Thanks to the 88-note Progressive Hammer-Action keyboard with escapement and high quality stereo-sampled piano sounds, VIVO H10 MG gives players the ultimate grand piano sound.
All sounds was recorded with holophonic method for an amazing 3D listening experience and reproduced using the new technology called T2L (True to Life), based on interaction between Sampling and Modelling methods. Moreover, the sound quality has been raised-up to 24 bit - 48KHz with an average of 5 times longer ever recorded samples (15“ on lower piano notes). VIVO H10 MG reproduces a real grand piano also thanks to unlimited notes polyphony (320 oscillators). The real sustain pedal simulation is designed for good-feeling response, and allows subtle performance nuances to be expressed.
Reading this manual you will discover many other features such as sympathetic resonances, harmonics, noises, staccato sounds, timbre variances, etc, etc.
To ensure that you obtain the maximum enjoyment and take full advantage of the piano functionality, please read all sections of the complete owner’s manual carefully (It is downloadable from the dexibell web site).
Keep this manual handy for future reference.
Start to take advantage of valuable benefits available simply registering your product on www.dexibell.com. • You can benefit of DEXIBELL's 3 years extended warranty (The extended warranty is subject to terms and conditions. Please refer to the related section).
• You can download the full version of the owner's manual.
• Keeps you updated on special offers.
• You can be updated on any new software release and new sounds.
Copyright © 2020 d .
All rights reserved. No part of this publication may be reproduced in any form without the written permission of d . QG Ver. e2
1 Important Safety Instruction
PLEASE READ CAREFULLY BEFORE PROCEEDING
Always follow the following precaution listed below to avoid user to the risk of serious injury or even death from electrical shock, fire or other hazard . WARNING CAUTION
Only use non-tropical weather
This unit and its AC adaptor can only be safely used in non-tropical weather. The operating temperature range is 5° - 40°C (41° - 104°F).
Do not repair, modify or replace parts by yourself
Do not attempt to repair the unit, modify or replace parts of the product. Please contact all the nearest Dexibell Service Center.
Do not disassemble or modify by yourself
Do not open the unit or its AC adaptor or attempt to disassemble or modify the internal component in any way.
Use only the supplied AC adaptor (DEXIBELL DYS6150-2400500W). Use only the AC adaptor included with the unit. Connecting a different AC adaptor can cause serious damage to the internal circuitry and may even pose a shock hazard.
Use only the supplied power cord
Use only the AC power cord supplied with the AC adaptor included in the package.
Do not excessively bend the power cord
Do not excessively twist or bend the power cord otherwise you damage it. Damaged cords may cause fire and shock hazards!.
Do not place the unit in an unstable location
Do not place the unit in a unstable position where it might accidentally fall over.
Take care not to allow liquid or foreign objects to enter unit; Do not place containers with liquid on unit
Do not place object filled with liquid (glass of water on this product. Never allow foreign objects (e.g., flammable objects, coins, wires) or liquids (e.g., water or juice) to enter this product. Doing so may cause short circuits, faulty operation, or other malfunctions.
Never place or store the product in the following types of locations • Exposed to extreme cold or heat (such as in direct sunlight, near a heater, or in a car during the day)
• Subject to steam or smoke
• Damp (such washroom, baths, on wet floors)
• Subject to salt water exposure
• Exposed to rain
• Dusty or sandy
• Subject to extreme changes of temperature or humidity (The condensation may occur and water may collect on the surface of the instrument. Wooden parts may absorb water and be damaged)
• Subject to high levels of vibration and shakiness.
Do not drop the unit or subject it to strong impact
Do not drop the unit. Protect it from strong impact!
Do not connect the unit to an outlet with an unreasonable number of other devices
Do not connect the unit’s power-supply cord to an electrical outlet with an unreasonable number of other devices. This could cause the outlet to overheat and possibly cause a fire.
Adults must provide supervision in places where children are present When using the unit in locations where children are present, never leave the unit unattended. Keep a special watch over any children so that they don’t mishandling of the unit can take place.
Avoid extended use at high volume
This unit, either alone or in combination with an amplifier and headphones or speakers, may be capable of producing sound levels that could cause permanent hearing loss. DO NOT operate for a long period of time at a high volume level, or at a level that is uncomfortable. If you experience any hearing loss or ringing in the ears, you should immediately stop using the unit, and consult an audiologist.
If you notice any abnormality turn off the unit immediately
Turn off the unit and remove the AC adaptor from the outlet when: • If the AC adaptor, the power-supply cord, or the plug has been damaged • If smoke or unusual smells occurs.
• If the product has been exposed to rain.
• If objects have fallen into, or liquid has been spilled into the unit. • If the unit does not operate or exhibits a marked change in performance. • If the unit has been dropped, or the enclosure of the product has been damaged.
Contact the nearest qualified Service Center.
Grasp the plug connecting or disconnecting the AC adaptor
When removing the electric plug from the instrument or an outlet, always
hold the plug itself and not the cord. Pulling by the cord can damage it.
Do not use wet hands to connect or disconnect AC adaptor
Never handle the AC adaptor or its plugs with wet hands when plugging
into, or unplugging from, an electrical outlet.
Keep clean the AC adaptor’s plug
At regular intervals, unplug the AC adaptor and using a dry cloth clean
the adaptor’s plug.
If the unit will be unused for an extended period of time, unplug the AC
power cord from the AC outlet.
Keep cables from getting entangled
Try to prevent cords and cables from becoming entangled. Place all cords
and cables away from children.
Before cleaning the unit, unplug the AC adaptor from the outlet
To avoid electric shock or damage the unit, before cleaning the unit, turn
it off and unplug the AC adaptor from the outlet (p. 10).
If there is a possibility of lightning strike in your area, disconnect the AC
adaptor from the outlet
If you know a thunderstorm is predicted in your area, disconnect the AC
adaptor from the outlet.
Take care so as not to get fingers pinched by lid
Be careful to avoid catching fingers (yours, or others, especially children’s)
when opening or closing the lid. Adult supervision is recommended
whenever small children use the unit.
Do not rest your weight on or place heavy objects on the unit.
Avoid to climb on top of, nor place heavy objects on the unit.
Cautions when moving this unit
• When transporting or moving the unit always use two or more people.
Attempting to lift the unit by yourself may damage your back, result in
other injury, or cause damage to the unit itself.
• The unit should be handled carefully, all the while keeping it level.
• Disconnect the power cord and all connected cables.
• Close the lid.
Place in a well ventilated location
The unit and the AC adaptor should be located so their location or
position does not interfere with their proper ventilation.
Do not use in tropical climates
Use the unit and the AC adaptor only in a moderate climates (not in
tropical climates).
Place near the socket outlet
This equipment should be installed near the socket outlet and
disconnection of the device should be easily accessible
Conventions Used in This Manual
The following symbols are used.
NOTE It indicates an important note; be sure to read it.
MEMO It indicates a memo regarding the setting or function; It’s up to you read it.
TIPS It indicates a useful hint for operation; read it as necessary.
4
2 Relevant Indications
In addition to the items listed under "Important Safety Instruction" on p. 4, please read and observe the following:
Power supply related
• Do not plug this unit into the same electrical outlet used same by an electrical appliance that is controlled by an inverter or a motor (such as a refrigerator, washing machine or air conditioner). Doing so, can result an audible noise.
• The power adaptor may become warm after long hours of consecutive use. It can be a normal dissipation of heat through the adaptor casing. To reduce the possibility of overheating place the power adaptor on the floor in a well-ventilated location.
• Before connecting the unit to other equipment, turn off the power to all equipment. Otherwise, electrical shock or damage to the equipment may occur.
• If the unit is not operative for 120 minutes. to prevent unnecessary power consumption, this unit features an “AUTO OFF” function that automatically turns the unit off. If you don’t want the unit to turn off automatically, change the “AUTO OFF” setting to “OFF”.
NOTE
The “AUTO OFF “ setting is memorized when you switch off the unit.
Related to appropriate location
• Do not place the unit near power amplifiers (or other equipment containing large power transformers) to avoid induced hum. In case of hum, to reduce the problem, change the orientation of your unit or place it away from the source of interference .
• Do not use this unit in the vicinity of a TV or radio. This unit may interfere with radio and television reception.
• When using this unit along with application on your iPhone/iPad, we recommend that you set “Airplane Mode” to “ON” on your iPhone/iPad in order to avoid noise caused by communication.
• Noise may be produced if cell phones are operated in the vicinity of this unit. In case of noise you should relocate such wireless devices so they are at a greater distance from this unit, or switch them off.
• Do not expose the unit to extreme cold or heat, to direct sunlight or near devices that radiate heat. Do not leave the unit inside an vehicle during the day. Extreme temperature can damage the unit.
• Take care when move the unit from one location to another with drastic changes in ambient temperature. Condensation can occur in the unit due to drastic change of temperature. Using the device while condensation is present can cause damage. If there is reason to believe that condensation might have occurred, leave the device for several hours until the condensation has completely dried out.
• Do not place, for long periods of time, vinyl, plastic or rubber objects on this unit. Such objects can discolor or otherwise harmfully affect the finish.
• Do not place objects for long period of time on top of the keyboard. This can be the cause of malfunction of the keys of the keyboard.
• Do not apply any stickers, decals or self-adhesive material to this unit. The glue is difficult to remove and solvents are damaging the exterior finish.
• Do not place object filled with liquid (glass of water on this unit. Avoid to use alcohol, perfume, hairspray, nail polish, etc., near the unit. In the event of liquid spill on the unit, swiftly wipe away the surface using a dry, soft cloth.
Related to external memories
• Insert the USB Memory (commercially available) into the slot with care and at the correct angle.
• Take particular care when handling USB Memory:
• Always ground yourself to something metal before handling an USB Memory • Do not touch the pins of the USB Memory connector, or allow them to become dirty. • Do not subject the USB Memory to temperature extremes (e.g., direct sunlight in an enclosed vehicle)
• Do not allow the USB Memory to become wet
• Do not drop or subject it to excessive shock or vibration.
• Do not disconnect the USB Memory while writing and reading data (i.e., while the USB Memory indicator blinks).
• Never use USB hub to connect USB Memory to the unit.
• This unit allows you to use commercially available USB Memory. You can purchase such devices at a computer store, a digital camera dealer, etc
• The audio recording require a USB storage device to support high sustained transfer rates. Not all USB devices will guarantee flawless performance.
Related to repairs
• Always back up your data on a USB memories before you send this unit for repair to an authorized center. All data contained in the unit’s memory my be lost. Important data should always be backed up, or written down on paper (when possible). Dexibell assumes no liability concerning such loss of data.
Other precautions
• The contents of memory could be lost due to malfunction or improper operation. To help prevent the loss of your data, we highly recommend that you periodically save a backup copy of important data you have stored in the unit’s memory on another storage device. (e.g., USB memories).
• Unfortunately, an error may occur during the data restore previously stored in the USB memories. Dexibell shall not be liable for loss of profits or any consequential loss, loss of data.
• Do not use excessive force when handling unit’s buttons, switches, sliders and controls and when use connectors and jacks. Rough handling can cause damage o malfunctions.
• Do not to apply strong pressure on the display.
• Always pull by the connector when disconnecting a cable, never pull the cable Not doing so you will cause shorts, or damage to the cable’s internal elements.
• Keep the unit’s volume levels down. The instrument should be used at a reasonable volume, to avoid disturbing neighbours, especially at night and in the early morning. Use headphones if you want to play your music loud or late at night.
• When you need to transport the unit, put it in its original packaging with padding in the box. Otherwise, you will need to use equivalent packaging materials. When transporting or moving the unit always use two or more people.
• To prevent possible damage, avoid applying excessive force to the music stand.
• For connecting this unit use cable low impedance cables. The use of cables that contain resistor can cause the sound level to be extremely low, or impossible to hear.
Maintenance related
• To clean the unit, put a soft cloth in lukewarm water , squeeze it well, then wipe the entire surface using an equal amount of strength. Rubbing too hard in the same area can damage the finish.
• If your unit has a polished finish, it needs careful, periodic care. Dust should be removed using a soft feather or wool-type duster. Care should be taken not to apply pressure to the finish or to drag the dust across the finish, which can create fine scratches in the surface. Fingerprints or similar marks can be cleaned with a dampened soft cloth, followed by a dry cloth. In cases of stubborn greasy dirt, using a small amount of mild detergent (such as mild dishwashing liquid) on the damp cloth may help. Do not use any cleaners or detergents, since they might deteriorate the surface of the cabinet, and produce cracks. Do not use dusting cloths that contain chemicals.
• Do not wipe this unit with benzene, alcohol or solvent of any kind . Doing so may result in discoloration and/or deformation of the unit.
Related to copyright and trademarks
• Dexibell do not assume legal liability regarding any infringements of the user through the use of this unit.
• Recording, copying, distribution of copyrighted material (songs, live performance, etc.) belonging to a third party in part or in whole without the permission of the copyright owner is forbidden by law.
• Copyright © 2003 by Bitstream, Inc. All rights reserved. Bitstream Vera is a trademark of Bitstream, Inc.
• iPad® and iPhone® are registered trademarks of Apple Inc.
• App Storesm is an Apple’s Service Mark
• Bluetooth® is registered trademarks of Bluetooth SIG, Inc.
5
3 General Description
a Grand Acoustic System
Specially designated speakers system for an immersive spatial sound. 15 loudspeakers , a soundboard built in Italy in "Val Di Fiemme", 4 DSPs and 4 amplifiers guarantee you a perfect sound diffusion at 360 degrees like with a real grand piano.
Soundboard Vibration System
b
One of the essential aspects of a grand piano is the sympathetic resonance created by the vibration of the entire instrument thanks to a soundboard built in Italy in "Val Di Fiemme. VIVO H10 MG simulates the complex sympathetic tones created when string vibrations are propagated to the soundboard.
c Progressive Hammer Action Keyboard with Escapement
Grand piano touch from the new exclusive Progressive Hammer Action Keyboard with Escapement, which associates the look and feel of wood with the durability of modern materials.
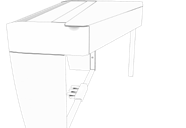
d Elegant Wood Cabinet
Elegant finishes to complement your living room.

e
a
c
a
a
f
a
d
6
General Description
e Keyboard Lid
Folding Keyboard Lid with soft closing and reclining blind.
Grand Pedal System
The pedals continually detect depression depth which lets players make minute adjustments to pedal depression and return, changing the
f
depth and character of their piano sound. Every detail is perfectly simulated up to the noise generated by the pressure and release of the pedal, all as a grand piano.
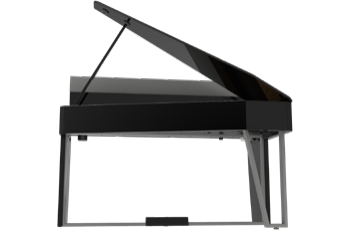
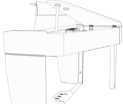
gAjustable Main Lid Positioning
The raised Main Lid serves as a reflecting surface for the sound waves that radiate from the soundboard. Thanks to the short and long lid stick (g) the Main Lid can be manually raised or lowered.See "Opening and Closing the Main Lid" (p. 12).
g

a
b
a
7
4 Panel Description
13
14
15
17
12
16
18 19 20 21 22
23
26
10 11
4 MIC LEVEL
24
25
1
Turns the power on or off (p. 13).
With the factory settings VIVO H10 MG’s power will automatically be switched off 120 minutes after you stop playing or operating the VIVO H10 MG.
If VIVO H10 MG’s power has been turned off automatically, you can use the [POWER] switch to turn the VIVO H10 MG back on. If you don’t want the power to turn off
automatically, set the “AUTO OFF” parameter to “OFF”.
NOTE
To avoid malfunctions, never disconnect the AC/DC adaptor while the instrument is turned on.
2 VOLUME
Use this knob to set VIVO H10 MG’s overall volume. 3 MIC EFFECT
Use this knob to adjust the amount of the effects currently applied to the microphone.
It adjust the level of the microphone connected to the MIC socket .
5 USB Computer Port
Use a USB cable to connect the VIVO H10 MG to your computer via this connector.
6 USB Memory Port
Connect a commercially available USB Memory here.
If you connect to this port an USB MIDI keyboard or modules you can exchange MIDI data without a computer and without using two MIDI cables.
NOTE
* Carefully insert the USB Memory making sure that the connector on the device is appropriate and that it is connected in the proper direction.
* Dexibell does not recommend using USB hubs, irrespective of whether they are active or passive. Please connect only one USB Memory to this port
7 Damper Pedal
Use this pedal to sustain the sound.
8 Sostenuto Pedal
The notes you are pressing when this pedal is depressed will be sustained, allowing future notes played to be unaffected. 9 Soft Pedal
This pedal is used to reduce the volume and slightly changes the timbre.
8
7 9 8
6 5
20 (Rec)
1
2
3 4
Panel Description
10 MIC socket
Use this socket to connect a microphone (unbalanced mono 1/4” ).
11 PHONES output
This is where you can connect one or two pairs of optional headphones. Doing so switches off the internal speakers.
12 Headphones Hook
Here you can hang your headphones.
13 Display
This display shows information related to your operation. 14 Function buttons
These buttons are used to select one of three functions/ options shows at the bottom of the display.
15 MEMORY/WRITE button
This button allows you shows the list of memories and then recall one of them.
Pressing and holding this button to write a memory . 16 Arrow buttons
These buttons are used to navigate around the various menus, adjust values.
17 MENU/EXIT
This button allows you to open and close the menu page where you can view and select all available functions.
18Q= (Tempo)
Use this button to change the tempo of metronome.
You can also enter tempos simply by tapping your finger on the button.
19(Metronome)
This button allows you to turn the metronome on or off.
This button is used to start or stop the recording of your song.
21 *-,
Press this button to start playing. Press it again to stop playing.
Press and hold it while pressing the [SONG] button to return to the beginning of the song.
22 SONG
This button allows you to switch in Song Mode.
Press it together with the button to listen the demo song.
23
L/K
This button calls up the transposition function. Its settings can be applied to the keyboard.
If the button indicator doesn’t light the instrument use its normal pitch.
24
This button enable or disable the layer keyboard mode.
Press it together with the button to enable or disable the "4 HANDS" keyboard mode.
25
This button enable or disable the split function.
Press it together with the button to enable or disable the "4 HANDS" keyboard mode.
26These buttons allow you to select tones by category
9
Rear Side
Panel Description
Rear View
27 28
29
27 DC IN socket
Connect the supplied AC/DC adaptor here (p. 11).
28 AUDIO OUTPUT R jack
This socket allows you to connect an external amplified
speakers.
30
29 AUDIO OUTPUT L/MONO jack
This socket allows you to connect an external amplified speakers.
NOTE
If you can/want to use only one channel on your external amplifier, connect this "L/MONO" socket to its input. For optimum sound quality, we recommend working in stereo, though.
30 Pedals Socket
Here is were you connect the pedal cable.
10
5 Before You Start to Play
Connecting the AC Adaptor
1. Rotate the [VOLUME] knob counterclockwise to minimize the volume.
2. Connect the included power cord to the AC adaptor. To an AC outlet
AC Adaptor
Power cord
NOTE
Depending on your area, the included power cord may differ from the one shown above.
NOTE
Be sure to use only the AC adaptor (DEXIBELL DYS6150-
2400500W) supplied with the unit. Also, make sure the line voltage at the installation matches the input voltage specified on the AC adaptor body. Other AC adaptors may use a different polarity, or be designed for a different voltage, so their use could result in damage, malfunction, or electric shock.
NOTE
If you won’t be using the VIVO H10 MG for an extended period of time, disconnect the power cord from the electrical outlet.
NOTE
To avoid malfunctions, never disconnect the AC/DC adaptor while the instrument is turned on.
3. Connect the AC adaptor to VIVO H10 MG’s DC IN socket positioned to the rear bottom panel.
REAR SIDE

Opening and Closing the Keyboard Lid
NOTE
• This unit is equipped with a safe closing system to avoid finger injuries when opening or closing the lid. Anyway be careful to avoid catching your fingers when opening or closing the lid. Adult supervision is recommended whenever small children use the unit.
• If you need to move the unit, make sure that the lid is closed to prevent accidents.
Opening the Keyboard Lid
WARNING
• Do not release the lid until it is fully opened.
1. Hold the front edge of the lid with both hands, then open the lid slowly until it reach the end-of-stroke position.
Using the Music Rest
Please find here below instruction regarding the opening and closing of the music rest.
Opening the Music Rest
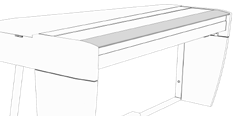
1. Open the lid. See "Opening the Keyboard Lid" just above. 2. Pull down the sheet music holder (1) as in the illustration below.
3. To provide extra space for the music sheet, pull down the front part of the lid (2) as in the illustration below. 2
DC IN
USE THE SUPPLIED ADAPTOR ONLY
PEDALS
1
11
Closing the Music Rest
1. Pull up the sheet music holder (1) as in the illustration below.
2. Pull up the front part of the lid (2) as in the illustration below.
Before You Start to Play
Opening the lid too high may damage the piano, or cause the lid to fall.
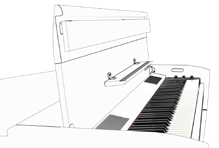
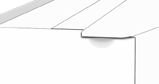
Main Lid Positioning
The main lid has two opening positions: half opened and full opened. Use one of them to hold the lid open at the desired angle.
A
2
1
The piano has two lid sticks of
differing lengths.
• The short stick in combination with the
socket (A) keeps the lid half open.
• The long stick in combination with the
socket (B) keeps the lid fully open.
short stick
B
long stick
Closing the Keyboard Lid
WARNING
• Allow the lid to close automatically. Do not force the lid.
• Be careful to avoid catching your fingers when closing the lid. Adult supervision is recommended whenever small children use the unit.
1. Before closing the lid, close the sheet music holder. See "Closing the Music Rest" as described just above.
2. Hold the lid with both hands and slowly accompany it to close automatically.
Allow the lid to close automatically. Do not force the lid.
Opening and Closing the Main Lid
The raised main lid serves as a reflecting surface for the sound waves that radiate from the soundboard. Thanks to the short and long lid stick the main lid can be manually raised or lowered.
NOTE
• Do not let children open or close the main lid. When opening or closing the Main lid, take care not to pinch your fingers between the moving part and the body of the unit.
• If you need to move the unit, make sure that the main lid is closed to prevent accidents.
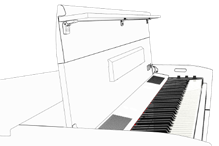
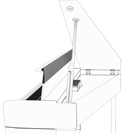
Opening the Main Lid
WARNING
When opening the cover, be careful not to open it too high.
1. Grasp the right side of the main lid (1) with both hands, and slowly raise it.
1
2. Use one hand to sustain the lid, raise the lid stick and fit it into the socket as in the illustrations.
Full open
Half open
WARNING
Do not release the lid until the lid stick is completely locked in the socket. To prevent falling of the lid, be sure that the lid stick is stable in the socket.
Closing the Main Lid
NOTE
Do not let children open or close the main lid. When opening or closing the Main lid, take care not to pinch your fingers between the moving part and the body of the unit.
1. Grasp the right side of the main lid with a hand, and raise the main lid a litle bit and, with the other hand, release
12
Connecting the Pedal Cord
the stick from the socket.
2. Place the stick in its rest position and slowly lower the lid
to close it.
Connecting the Pedal Cord
REAR SIDE

PEDALS
1. Connect the pedal cord that come from the dedicated stand here.
For further information see the Assembling Manual.
.
Turning the Power On/Off
Once everything is properly connected, be sure to follow the procedure below to turn on their power.
1. Rotate the [VOLUME] knob counterclockwise to minimize the volume.
NOTE
Before turning the VIVO H10 MG on/off, always be sure to turn the volume down. Even with the volume turned down, you might hear some sound when switching the VIVO H10 MG on/ off.
However, this is normal and does not indicate a malfunction.
2. Press the VIVO H10 MG’s [ " ] button located on the right panel to switch it on.
The power will turn on, a progress bar appear in the VIVO H10 MG’s display,.
After a brief interval, the main page will appear. and VIVO H10 MG will be ready to produce sound.
3. Use the [VOLUME] knob to adjust the volume.
NOTE
This unit is equipped with a protection circuit. A brief interval (a few seconds) after power up is required before the unit will operate normally.
Turning the Power Off
1. Rotate the [VOLUME] knob counterclockwise to minimize the volume.
NOTE
To avoid malfunctions, never disconnect the AC/DC adaptor while the instrument is turned on.
2. Press the VIVO H10 MG’s [ " ] switch.
A power off confirmation message appears:
3. Press the "YES" Function button to confirm. The display shows the following message:
and the unit will turn off after few seconds.
If you do not want power off press the "NO" Function button.
NOTE
If you need to turn off the power completely, first turn off the [" ] button, then unplug the power cord from the power outlet. Refer to "Connecting the AC Adaptor" (p. 11).
13
Before You Start to Play
If you do not operate the unit for a certain period
of time while the power is on, this unit turns off
automatically.
If you don’t want the power to turn off automatically,
turn the “AUTO OFF” setting off !
With the factory settings, the unit’s power will automati
cally be switched off 120 minutes after you stop playing
or operating the unit.
Shortly before the VIVO H10 MG shuts down automatically,
the display starts counting down the seconds. If you want to
keep using the VIVO H10 MG at this stage, press any button.
If you don’t want the power to turn off automatically,
change the “AUTO OFF” setting to “OFF” .
Demo of the VIVO H10 MG
Your VIVO H10 MG contains a demo that introduces all the best of its
tones.
1. Simultaneously press the [ ] and [SONG] buttons.
Playback starts automatically with the demo song.
2. Press the [MENU/EXIT] button to leave the demo function.
NOTE
All rights reserved. Unauthorized use of this material for
purposes other than private, personal enjoyment is a violation
of applicable laws.
14
6 Connections Quick Guide
Peripheral Devices
NOTE
Before to connect your
microphone to the MIC socket, rotate the [MIC LEVEL] knob counterclockwise to minimize the volume.
MIC IN
Audio and MIDI Bluetooth
AUDIO + MIDI Streaming USB to Computer (MIDI)
USB Memory
OR
VIVO H10 - Master (host)
2 Headphones
USB cable A→B-type
Slaves
NOTE
Before to connect external
Amplified Speakers,
move the [VOLUME] knob
counterclockwise to minimize
the volume.
Left Amplified Speaker Right Amplified Speaker
15
7 Basic Operation
About the Display and Cursor Operation
This section introduces the information that appear on the main page. Moreover this section illustrates how to navigate the menu. Main Page
The VIVO H10 MG main page contains many useful information.
Main part tone
Icons field see the table below
The underline under the tone
field refers to the part whose tone assignment can be changed. Tone selection always applies to the part whose field is underlined.
Left part tone
Function buttons
Use these function buttons to select one of three functions/ options shows at the bottom of the display.
Main octave value Left octave value
16
Moving the cursor and setting parameter values
1. Press the [MENU/EXIT] button to access to the available function groups.
About the Display and Cursor Operation
Assigning the Name You Specify
In many cases you'll have to assign a name to a file. In the following example, we will learn how to give a Memory name.
After the selection of saving a Memory, the display looks as follows:
A Memory name is suggested by the VIVO H10 MG.
2. Use the [▲] [▼] buttons to select the desired function group.
1. Use the [▲][▼] buttons to select a different character. 2. Use the [◄] [►] buttons to select the next character position you want to change, then use the [▲][▼] buttons again.
3. You can press the [A/a/#] Function button to switch between upper- and lower-case characters as well as numbers.
4. To delete the selected character, simultaneously press the
central and right Function button.
3. Press the [►] button to enter in the selected function
group.
4. Use the [▲] [▼] buttons to scroll the list of parameters. The selected parameter field is underlined.
5. Use the [◄] [►] buttons to set the desired value. 6. Press the [MENU/EXIT] button to return to the main page.
5. To insert a character, simultaneously At the same press the left and central Function button.
6. Repeat steps (2) and (3) to complete the name.
17
8 Quick Guide
Reverberation
You can modify the reverberation to the sound
to your liking.
Press the Function button that shows "REVERB"
at the bottom of the display.
Use the [◄] [►] buttons to adjust the amount
of reverb of the selected part.
Grand Piano Mode
When you want to reset various settings and play Grand Piano:
From the Main page, simultaneously press the first and last Function button.
Menu/Exit Button
Function Buttons Press this button to open and close the menu page where you can view and select all available
Press these buttons to select functions/options
shows at the bottom of the display.
+
Favorite Settings
HOW TO MEMORIZE YOUR FAVORITE SETTING
functions..
Using the metronome
Press the [ ] button to start the metronome. To adjust the tempo and time signature use the [Q=] button.
Listening the Demo Song
The VIVO H10 MG allows you to memorize your favorite settings for easy recall whenever they’re needed. Up to 80 complete setups can be saved.
Press and hold the [MEMORY/WRITE] button to call up the memories page (the indicator of the button flashes).
Use the [▲] [▼] buttons to select one of the memory location. Press the function button that shows "SAVE" at the bottom of the display Use the [▲] [▼] and [◄] [►] buttons to enter the desired name.
To confirm press the function button that shows "OK" at the bottom of the display
HOW TO RECALL YOUR FAVORITE SETTING
Press the [MEMORY] button to call up the memories page.
Use the [▲] [▼] buttons to select one of the memory location. Press the "RECALL" function button under the display to select the memory.
MEMO
Please note that it is also possible to memorize and recall directly on an USB Memory (commercial available).
Simultaneously press the [ ] and [SONG] buttons.
Changing the Tempo/Time Signature
You can adjust the tempo of the metronome. Press the [Q=] button to display the tempo page.
Use the [▲] [▼] buttons to select the tempo, the time signature field or an available preset tempo
Use the [◄] [►] buttons to adjust the value.
18
Recording a Song
Press the [! ] button to start recording.
Play your song.
Press the [! ] button again to stop
recording.
Keyboard Mode Selection
At power-on, you play a piano sound over the entire keyboard (The [ ] and [ ] indicators are off).
Sound A
Sound A
Sound A
Press the [ ] button to play two different sounds over the Sound A
entire keyboard.
Sound A + Sound B
Sound A + Sound B
Sound A + Sound B
Sound A + Sound B
Quick Guide
Turning the Power On
Press the VIVO H10 MG’s [ " ] switch.
p. 13
Volume Adjusting
Adjust the volume rotating the knob
MIC Adjusting
Use the [MIC EFFECT] knob to adjust
the amount of the effect currently
applied.
Use the [MIC LEVEL] knob to adjust
the microphone input level.
Selecting and Playing a Song
Press the [SONG] button to display the Song main
page.
Press the "SONG LIST" Function button
Use the [▲] [▼] buttons to select a song.
Press the "SELECT" Function button to load the song.
Press the [ *-, ] button to start playing.
Selecting a Tone
Press one of the family tone buttons
Press [▲] [▼] to select another desired tone in the list
Press [◄] [►] to select another family tone
HOW TO SET A FAVORITE TONE
Press and hold the family button of the selected tone
Sound C
Sound A
Press the [ ] button if you want to play different sounds
Sound C
Sound A
with your left and right hands.
Sound C
Split Point
Split Point
Sound C
Sound A Sound A
Transposing the Keyboard
Sound A
Split Point Sound A
To enter in "4 hands" mode, simultaneously press the [ ]
Split Point
Sound A
and [ ] button.
Split Point
Sound A
Split Point
Sound C Sound A + Sound B
Split Point
Sound C Sound A + Sound B
Press the [L/K] button to calls up the page where you can change the transposition value.
Use the [◄] [►] buttons to change the value.
Split Point
Sound C Sound A + Sound B Split Point
The keyboard modes listed above are by default. VIVO H10 MG has in addition Sound C Sound A + Sound B
Split Point
two other modes: Play three different sound over the entire keyboard or, in split mode, play one sound with your left hand and two sounds with your right hand.
Split Point
Split Point
19
Quick Guide
VIVO H10 MG Tone List
MODERN
0001 71 0002 70 0003 72 0004 73 0005 74 0006 2
0007 2 0008 3 0009 1
CLASSIC
0010 61 0011 60 0012 62 0013 63 0014 64 0015 80 0016 81 0017 82 0018 83 0019 84 0020 0
0021 0 0022 1 0023 2 0024 4 0025 0
E.PIANO
0026 107 0027 108 0028 109 0029 110 0030 111 0031 113 0032 114 0033 115 0034 106 0035 101 0036 102 0037 103 0038 104 0039 105 0040 116 0041 117 0042 118 0043 119 0044 100 0045 112
ORGAN
0063 0 0064 2 0065 1 0066 0 0067 1 0068 0 0069 1 0070 2 0071 3 0072 4 0073 5 0074 6 0075 0 0076 1 0077 2 0078 3
ENSEMBLE
0079 5 0080 10 0081 4 0082 2 0083 1 0084 6 0085 7 0086 8 0087 9 0088 1 0089 1 0090 1 0091 0
(MORE)
0106 0 0107 0 0108 0 0109 0 0110 0 0111 0 0112 0 0113 0 0114 0 0115 0 0116 2 0117 0 0118 1 0119 1 0120 0 0121 0 0122 3 0123 4 0124 0 0125 1
20
9 Specifications
ITEMS
KEYBOARD TYPE
• TP-400 W (Hybrid, Wood) 88 Keys - Weighted, Hammer action,Triple contact
• Ivory & Ebony feels
• Escapement
TECNOLOGY/CPU Quad Core Cortex @ 1.8 GHz 4GB memory TONE GENERATOR T2L: Sampling and Modelling Technology
SAMPLING
SOUND WAVE FORMAT 24 bit linear - 48 KHz (Internal processing and DSP at 32 bit floating)
DIGITAL ANALOG CONVERTION (DAC) MAXIMUM POLYPHONY
SOUNDS 125 including 3 PLATINUM sounds User downloadable from website (Sound Font Compatible), using "seamless changes" technology at sound recall
MEMORY
WAVE MEMORY
KEYBOARD MODE TOUCH SENSITIVITY REVERB
EFFECTS
MIC IN EFFECTS MASTER EQUALIZER PLAYER AUDIO
RECORDER AUDIO .wav (48 kHz, 32-bit floating) on USB Memory MASTER TUNING YES: 415,4Hz to 466,1 Hz (adjustable increments of 0,1 Hz) + 2 Preset (440 Hz, 442 Hz) TEMPERAMENT 9 Types USER TEMPERAMENT 3 User
RHYTHM PATTERNS METRONOME
CONTROLS
MUSIC REST
PEDALS
Keyboard Lid Folding with soft closing and reclining blind
Wireless Connections
DISPLAY Graphic LCD 128 x 64 dots Organic LED, high contrast type
CONNECTORS SPEAKERS
4 woofer x 8.9 cm (3,5 inches),
6 near-field speakers x 3,2 cm (1,3 inches)
2 Full range x 12.7 cm (5 inches)
3 middle-high range (binaural system) x 6.35 cm (2.5 inches)
Real wooden vibrating Soundboard" near-field speakers x 3,2 cm (1,3 inches)
21
Specifications
ITEMS
RATED POWER OUTPUT Quadriamp: 112 W max @ THD+N < 0.1% DSP ON AMPLIFIER Dynamic EQ - 3 Band Compressor AUTO POWER-ON AFTER SHUT-DOWN Yes, selectable VOLUME LEVEL SPL 113.6 dB max
POWER SUPPLY
POWER CONSUMPTION DIMENSIONS
Stand By: < 0,2 W
Maximum: 70 W
"ErP" LEVEL VI for Echo efficiency on stand-by consumption
WEIGHT 87.8 kg (excluding AC adaptor)
193 lbs 10 oz (excluding AC adaptor)
PACKAGE 1 box
SUPPLIED ACCESSORIES AC adaptor (DEXIBELL DYS6150-2400500W) OPTIONS (sold separately) Headphone: DEXIBEL DX HF7
Bench: DEXIBELL DX BENCH
• Bluetooth® is registered trademarks of Bluetooth SIG, Inc.
• Wi-FiTM is registered trademarks of Wi-Fi Alliance.
NOTE
In the interest of product, the specification and description are subject to change without notice.
22
This product complies with the requirements of EMC Directive 2004/108/EC. NOTICE
For European Countries For Canada
This Class B digital apparatus meets all requirements of the Canadian Interference-Causing Equipment Regulations. AVIS
Cet appareil numérique de la classe B respecte toutes les exigences du Règlement sur le matériel brouilleur du Canada.
For European Countries
EUROPEAN COMMUNITY DECLARATION OF CONFORMITY Radio and Telecommunications Terminal Equipment.
Dexibell declares that the wireless module of this unit is in compliance with the essential requirements and other relevant provisions of Directive 1999/5/EC.
IMPORTANT NOTICE FOR THE UNITED KINGDOM
IMPORTANT: THE WIRES IN THIS MAINS LEAD ARE COLOURED IN ACCORDANCE WITH THE FOLLOWING CODE.
BLUE:
BROWN:
NEUTRAL LIVE
As the colours of the wires in the mains lead of this apparatus may not correspond with the coloured markings identifying the terminals in your plug, proceed as follows:
The wire which is coloured BLUE must be connected to the terminal which is marked with the letter N or coloured BLACK. The wire which is coloured BROWN must be connected to the terminal which is marked with the letter L or coloured RED. Under no circumstances must either of the above wires be connected to the earth terminal of a three pin plug.
For European Countries
This Symbol indicates that in EU countries, this product must be collected separately from household waste, as defined in each region. Products bearing this Symbol must not be discarded together with household waste.
Komentar
Posting Komentar